OTX-Runtime for DotNet  
HTML-Screen Implementation

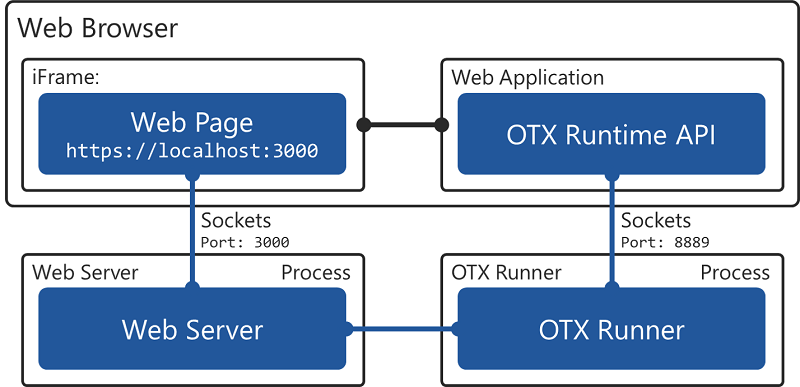
An HTML-Screen implementation is a screen, which can be displayed as a web page inside a normal web browser. The layout of a screen is described inside an HTML file. The HTML file contains placeholders for the related screen parameters, see ScreenParameter and some JavaScript to update the parameters. With the OTX-Mapping editor the parameters of a screen signature can be mapped to the placeholders inside an HTML file. If such a screen will opened via OpenScreen and if not already done a Web Server will started. The web server provides the HTML web page and opens a web socket communication with this page. A web application can integrate the content of that web page into an iFrame inside a normal web browser.

Note: The Assembly-Screen Implementation is the default implementation of ICustomScreenImplementation (see DefaultCustomScreenImplementation) delivered with the OTX runtime API.
The HTML-Screen implementation supports the following OTX data types:

  • All simple data types (Boolean, Integer, Float, String)
  • ByteField
  • BlackBox
  • List which contains one of the listed data type in an arbitrary depth
  • Map which contains the listed data types in an arbitrary depth
  • Structure which contains the listed data types in an arbitrary depth
  • Enumeration
  • ResourceLocation

Web Server

The web server has the following functions:

  1. Provide an HTML web page
    • If the web browser re-loads the web page, the web server replaces all placeholders of the HTML web page with valid values
  2. Socket Commands Sends "web socket commands" in JSON format to the client, if a screen was opened (OpenScreen), highlighted (HighlightScreen) or closed (CloseScreen) or if one of the following screen parameters was updated:
  3. Socket Commands Receives "web socket commands" from the client to update one of the following screen parameters inside the OTX runtime:

Note: Client-Side processing - Due to performance issues the the screen will be processed at the client, inside the browser via JavaScript and not at the server. Therefore the web page contains active content and the browser must be support JavaScript!

Note: The web server is not part of the normal distribution. There is a separate installer which must be downloaded and installed.

Note: If not already started, the web server must be started, see Start Web Server!

Note: The web server is only available for Windows currently.

Configuration

The web server should be configured - The web server settings must be adjusted inside the web server configuration, see config.json found in c:/Users/Public/OpenTestSystem/HtmlScreen/

Example of web server config file config.json:

{
"NodeJsPath": "file://C:/Program Files (x86)/OpenTestSystem/HtmlScreen/NodeJs/",
"WebserverPath": "file://C:/Program Files (x86)/OpenTestSystem/HtmlScreen/Webserver/",
"SecureWebSocket": "FALSE",
"ServerPort": "3000",
"WebSocketPort": "8080",
"DefaultScreenPath": "file://C:/Example/defaultScreen.html",
"StaticFilesPath": "file://C:/Example/Public/CSS/"
}

Parameters:

NodeJsPath = Path to the NodeJs binaries. NodeJs is a 3rd party library which is necessary for the web server and will be installed with the installer above.
WebserverPath = Path to the binaries of the web server.
SecureWebSocket = "TRUE", if the web server should use secured web socket (@c https://) or "FALSE" for unsecured web socket (@c http://)
ServerPort = Port where the web server delivers the web pages
WebSocketPort = Port of the web socket
DefaultScreenPath = Path to the DefaultScreen HTML page of the web server
StaticFilesPath = Path to the binaries containing static files like CSS, JS, etc...

Note: The StaticFilesPath element is optional. If be left empty, the default path would be: C:/Users/Public/OpenTestSystem/Apps

Note: The CSS files (or JS files) could also be placed next to the HTML files.

Addresses

The web server delivers the webpage at the address:

https://localhost:ServerPort/AppId

Parameters:

ServerPort = Port where the web server delivers the web pages
AppId = Optional AppId to which the screen is mapped inside @ref OTXMappingApi "OTX Mapping"
Address Description
http://localhost:ServerPort All open screens will displayed. The last opened or highlighted screen is in foreground.
http://localhost:ServerPort/AppId Only the screen which is mapped to the AppId will displayed

Sample:

https://localhost:3000 // All screens used a secure web socket will be displayed. The last "opened" or "highlighted" screen (see SocketCommands) is the top screen.
http://localhost:3000/AppID1 // Screen with AppId = "AppID1" will be displayed without secure web socket

Start

If not already started, the web server must be started. There are different ways to start the web server.

  1. Inside the OTX Development Environment and the Open Test Player the web server will be started automatically.
  2. Inside an own application the web server can be started via StartHtmlWebServer and can be stopped via StopHtmlWebServer of the DefaultCustomScreenImplementation.
  3. The web server can be started manually via console.
    1. Start Windows console, e.g. via cmd
    2. Change the directory to the path of the installed web server, e.g. cd c:\Program Files (x86)\OpenTestSystem\HtmlScreen
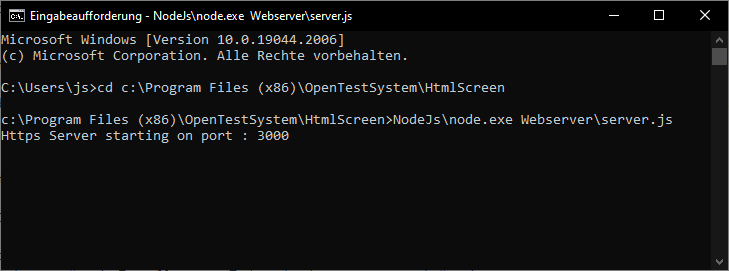
    3. Start the web server via NodeJs\node.exe Webserver\server.js

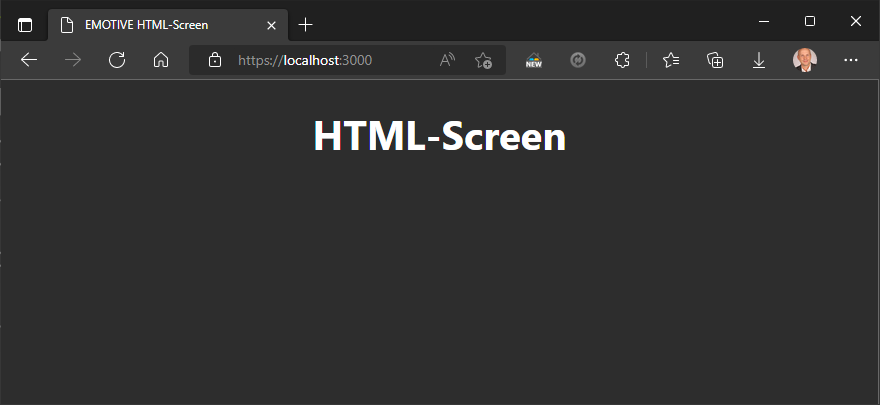
Note: To check, if the web server is started, open the address of the web server inside a browser. The address depends on the Configuration, example: https://localhost:3000/. You should see the Default Screen.

Default Screen

If the web server is started and no other screen is opened, the default screen will be displayed. The user can change the default screen, see parameter DefaultScreenPath in Configuration.
Socket Commands

Command Direction Description
OpenScreen Server to Client Informs the client that a screen was opened, see OpenScreen
HighlightScreen Server to Client Informs the client that a screen was highlighted, HighlightScreen
CloseScreen Server to Client Informs the client that a screen was closed, see CloseScreen
UpdateValueOnCustomHtml Server to Client Informs the client about a parameter value update
UpdateValueRuntime Client to Server Informs the web server that a parameter value was changed

OpenScreen

The web socket command OpenScreen is a JSON request message, send by the web server to the client. The web server will send this request, when a screen was opened inside the OTX runtime and after a new HTML page is available at the server and the client should reload the page, so that the new page can be displayed. The command has the following format:

{
"TypeRequest" : "OpenScreen", // Command name
"Data" : null, //
"ScreenSignature" : "", // Full qualified name of the related screen signature to which the screen belongs
"AppId" : "" // Name of the related AppId
}

Example:

{
"TypeRequest" : "OpenScreen",
"Data" : null,
"ScreenSignature" : "eTesterSamples.FunctionGenerator.Screen2",
"AppId" : "AppId2"
}

Note: To receive this command the client must handle the onmessage event of the web socket connection.

socket.onmessage = function(event)
{
// ...
if (res != null && res["TypeRequest"] == "OpenScreen")
{
if (screenSignature != res["ScreenSignature"])
{
location.reload();
}
}
// ...
};

HighlightScreen

The web socket command HighlightScreen is a JSON request message, send by the web server to the client. The web server will send this request, when a screen was highlighted inside the OTX runtime and after a new HTML page is available at the server and the client should reload the page, so that the new page can be displayed. The command has the following format:

{
"TypeRequest" : "HighlightScreen", // Command name
"Data" : null, //
"ScreenSignature" : "", // Full qualified name of the related screen signature to which the screen belongs
"AppId" : "" // Name of the related AppId
}

Example:

{
"TypeRequest" : "HighlightScreen",
"Data" : null,
"ScreenSignature" : "eTesterSamples.FunctionGenerator.Screen2",
"AppId" : "AppId2"
}

Note: To receive this command the client must handle the onmessage event of the web socket connection.

socket.onmessage = function(event)
{
// ...
if (res != null && res["TypeRequest"] == "HighlightScreen")
{
if (screenSignature != res["ScreenSignature"])
{
location.reload();
}
}
// ...
};

CloseScreen

The web socket command CloseScreen is a JSON request message, send by the web server to the client. The web server will send this request, when a screen was closed inside the OTX runtime and after a new HTML page is available at the server and the client should reload the page, so that the new page can be displayed. The command has the following format:

{
"TypeRequest" : "CloseScreen", // Command name
"Data" : null, //
"ScreenSignature" : "", // Full qualified name of the related screen signature to which the screen belongs
"AppId" : "" // Name of the related AppId
}

Example:

{
"TypeRequest" : "CloseScreen",
"Data" : null,
"ScreenSignature" : "eTesterSamples.FunctionGenerator.Screen2",
"AppId" : "AppId2"
}

Note: To receive this command the client must handle the onmessage event of the web socket connection.

socket.onmessage = function(event)
{
// ...
if (res != null && res["TypeRequest"] == "CloseScreen")
{
if (screenSignature != res["ScreenSignature"])
{
location.reload();
}
}
// ...
};

UpdateValueOnCustomHtml

The web socket command UpdateValueOnCustomHtml is a JSON request message, send by the web server to the client. The web server will send this request, when the value of a parameter has been changed, so that the client can update the HTML page. The command has the following format:

{
"TypeRequest" : "UpdateValueOnCustomHtml", // Command name
"Data" : // Command data structure
{ //
"Name" : "", // Name of a screen parameter
"Value" : "", // Value of the screen parameter in JSON format
"PlaceHolderString" : null //
}, //
"ScreenSignature" : "", // Full qualified name of the related screen signature to which the parameter belongs
"AppId" : "" // Name of the related AppId
}

Example:

{
"TypeRequest" : "UpdateValueOnCustomHtml",
"Data" :
{
"Name" : "Werte",
"Value" : "9.4578739035454831",
"PlaceHolderString" : null
},
"ScreenSignature" : "eTesterSamples.FunctionGenerator.Screen2",
"AppId" : "AppId2"
}

Note: To receive this command the client must handle the onmessage event of the web socket connection.

let socket = new WebSocket(urlWebSocket);
socket.onmessage = function(event)
{
// ...
if (res != null && res["TypeRequest"] == "UpdateValueOnCustomHtml")
{
if (screenSignature == res["ScreenSignature"])
{
valueUpdate = JSON.parse(res["Data"]);
var name = valueUpdate["Name"];
var value = valueUpdate["Value"];
UpdateValueCustomHtml(name,value);
}
}
// ...
};

UpdateValueRuntime

The web socket command UpdateValueRuntime is a message, send by the client to the web server to update a certain value of a screen parameter.The command has the following format:

"UpdateValueRuntime|ScreenSignatureName|ScreenParameterName|ScreenParameterLiteralValue"

Note: The format of the ScreenParameterLiteralValue is described in Data Type Handling.

Example:

"UpdateValueRuntime|eTesterSamples.FunctionGenerator.Screen2|Werte|10.0"

Note: The client must send this command via the send method of the web socket connection.

function UpdateValueRuntime(screenSignature, name, value)
{
var request = "UpdateValueRuntime|" + screenSignature + '|' + name + '|' + value;
if (socket != null && socket.readyState == WebSocket.OPEN)
{
socket.send(request);
}
}

Update Structure Value Example:

"UpdateValueRuntime|eTesterSamples.FunctionGenerator.Screen2|Werte|[{"Name":"StructureElement1","Type":"String","Value":""}, {"Name":"StructureElement2","Type":"Float","Value":0.5}]"

Update Enumeration Value Example:

"UpdateValueRuntime|eTesterSamples.FunctionGenerator.Screen2|Werte|{"SignatureName":"eTesterSamples.FunctionGenerator.EnumSig","Name":"Element1","Value":"1","Specification":""}"

HTML-Screen template file

The HTML-Screen template file is an arbitrary HTML, example see Screen1.html inside the sample PTX below, file which contains:

  1. The layout of the screen The layout is described by HTML format.
  2. The placeholders which will be mapped to screen parameter values
    The format of the placeholders is described below, see Parameter Placeholders and Other Placeholders and DataType Signature Placeholder
  3. JavaScript to manage the web socket messages (receive and send)
    Because of the client-side processing the complete logic is described inside the weg page. The author have to program a special web page. An annotated example shows how it works, see below.

Note: The file and all its dependencies must be located inside the external application path of the OTX-Runtime API, see Project Settings

Note: Each file can contain only one screen and its related screen signature.

Example client-side processing in JavaScript:

To see the example click here to fold.

// Mandatory dynamic content for client-side processing
// ====================================================
// start // Do not change the content between 'start" and 'end'
// Declare variables for web socket URL and the name of the screen signature.
var urlWebSocket = $Url_WebSocket; // $Url_WebSocket will be replaced by the web server at runtime
var screenSignature = $Screen_Signature; // $Screen_Signature will be replaced by the web server at runtime
// Creates a web socket at the given URL
let socket = new WebSocket(urlWebSocket);
// Adds an event handler if the socket receives a message
// Called each time, if a new parameter value was send from OTX procedure to web page
// Valid for ScreenInParameter and ScreenInOutParameter
socket.onmessage = function(event)
{
var msg = event.data;
var res;
// Parse the received message
if (msg.indexOf("UpdateValueRuntime") != 0)
{
res = JSON.parse(msg);
}
// If the message wants to update a value on the screen
if (res != null && res["TypeRequest"] == "UpdateValueOnCustomHtml")
{
if (screenSignature == res["ScreenSignature"])
{
// Parse the data of the message to get parameter name and value
valueUpdate = JSON.parse(res["Data"]);
var name = valueUpdate["Name"];
var value = valueUpdate["Value"];
// Update the value of the given parameter
UpdateValueCustomHtml(name, value);
}
}
};
// Must be called each time, if a new parameter value must be send from web page to OTX procedure
// Valid for ScreenOutParameter and ScreenInOutParameter
function UpdateValueRuntime(screenSignature, name, value)
{
var request = "UpdateValueRuntime|" + screenSignature + '|' + name + '|' + value;
if (socket != null && socket.readyState == WebSocket.OPEN)
{
socket.send(request);
}
}
// end
// ====================================================
// Optional dynamic content for client-side processing depending on the parameters of the screen
// =============================================================================================
// start
// Declare all values for ScreenInParameter with placeholders
var Beschriftungen ={{type='ScreenSignatureInParameter' name='Beschriftungen' datatype='List<String>' description='Liste der angezeigten Beschriftungen der Balken'}};
// Update the parameter value inside the screen
UpdateValueCustomHtml("Beschriftungen", Beschriftungen);
// Update the parameter values in HTML
function UpdateValueCustomHtml(name, value)
{
if (name == "Beschriftungen")
{
if (value instanceof Array)
{
document.querySelector('#Beschriftungen1').textContent = value[0];
document.querySelector('#Beschriftungen2').textContent = value[1];
}
}
}
// end
// =============================================================================================

Parameter Placeholders

The HTML-Screen placeholders has two functions:

  1. List all screen properties inside the mapping editor at design time
  2. Update screen properties at runtime. The update of the following screen parameter values can be performed in two directions. From OTX-Runner to the screen and vice versa.

Format of placeholder:

{{type='???' name='???' datatype='???' description='???'}}

Placeholder parameter:

Parameter Required Description
type x Type or direction of the ScreenParameter which can be bound to this placeholder. Possible values are 'ScreenInParameter', 'ScreenTermParameter', 'ScreenOutParameter' and 'ScreenInOutParameter'
name x Placeholder name. The name will be mapped inside the mapping file and must be unique inside the template file.
datatype x Name of the expected data type of the placeholder. This is only required for the type safe mapping inside the mapping editor at design time, see OTX data types.
description - Description of the placeholder. The description will be displayed as a tool tip inside the mapping editor at design time.

Placeholder examples:

{{type='ScreenSignatureInParameter' name='Title' datatype='String' description='The title is displayed in the header of the screen'}}
{{type='ScreenSignatureInParameter' name='GenericButtonBar_ButtonsTexts' datatype='List<String>' description='These buttons are displayed in a bar with the transferred text. There are as many buttons as there are list entries.'}}

Format of Structure value sent to HTML-Screens as JSON:

[{"Name": "default", "Type": "default", "Value": "default"}, {"Name": "default2", "Type": "default2", "Value": "default2"}]

Format of Enumeration value sent to HTML-Screens as JSON:

{"SignatureName":"default","Name":"default","Value":0,"Specification":"default"}

Note: The SignatureName attribute is required to identify which signature the enumeration element belongs to. Please change this element with caution.

DataType Signature Placeholder

These placeholders will represent the Structure Signature and Enumeration Signature in HTML template file. The placeholders can be placed anywhere in the HTML template file, but it would be best to place them in a const variable inside a <script> tab.

Note: In case a structure signature is referenced in another structure signature. Then the placeholder of that structure signature should be declared first.

Format of Structure Signature placeholder:

{{signatureName='???' type='StructureSignature' description='???' elements=[{elementName='???' datatype='???' description='???'}, {elementName='???' datatype='???' description='???'}]}}

Structure Signature placeholder example:

const StructureSignature = "{{signatureName='StructureSignature1' type='StructureSignature' description='' elements=[{elementName='Element1' datatype='Float' description=''}, {elementName='Element2' datatype='String' description=''}]}}";

Structure Signature placeholder example 2:

const StructureSignature1 = "{{signatureName='StructureSignature1' type='StructureSignature' description='' elements=[{elementName='Element1' datatype='Float' description=''}]}}";
const StructureSignature2 = "{{signatureName='StructureSignature2' type='StructureSignature' description='' elements=[{elementName='Element1' datatype='StructureSignature1 (Structure)' description=''}]}}";

Format of Enumeration Signature placeholder:

{{signatureName='???' type='EnumerationSignature' description='???' elements=[{elementName='???' value='???'},{elementName='Element2' value='???'}]}}

Note: The value of an EnumerationElement can only be an integer number. If the value is something else, the Element won't be created when mapped.

Enumeration Signature example:

const EnumSignature = "{{signatureName='EnumSignature1' type='EnumerationSignature' description='' elements=[{elementName='Element1' value='1'},{elementName='Element2' value='2'}]}}";

Other Placeholders

The following placeholders should exist inside the HTML file. They will be replaced by the web server with the right values.

Placeholder Description
$Url_WebSocket Web socket URL which is configured in Web Server, e.g. "ws://localhost:8080" or "wss://localhost:8080"
$Screen_Signature Full name of the OTX screen signature, e.g. "eTesterSamples.FunctionGenerator.Screen2". If a message is for the related screen, this value will match with the name of the screen signature inside this message. The value can be used to distinguish the web socket messages for other screens.

Manual installation of the HTML-Screen implementation

  1. Unzip the OtxHtmlScreens zip file into the path you want, e.g. "C:\Program Files\Porsche\PIDT"
  2. Created the config.json found in c:/Users/Public/OpenTestSystem/HtmlScreen/ if it doesn't exist. And config this file according format in Web Server. Change the value of keys (NodeJsPath, WebserverPath, DefaultScreenPath) by the path you unzip above
  3. Import the Certificate for Webserver in order to run with security websocket:
  • Go to the path you unzip above and find the Webserver\ssl-cert\localhost.p7b file, e.g. "C:\Program Files\Porsche\PIDT\OtxHtmlScreens_6.3.0.38131\Webserver\ssl-cert\localhost.p7b"
  • ​Import the certificate above for Trusted Root Certification Authorities and Intermediate Certification Authorities

How to use HTML-Screen Implementation

  1. Install and configure the web server, see Web Server
  2. Create HTML-Screen template file with placeholders and dynamic content, see HTML-Screen template file
  3. Execute the OTX procedure, e.g. with OTX-Runtime API or OTX Development Environment
  4. Open a web browser and and input http://localhost:3000 for unsecured and https://localhost:3000 for secured communication. The port number is the number configured in the web server configuration ServerPort, see Web Server.

The web page should now be displayed.

Note: If the web page will not displayed right, please refresh the web page inside the browser, e.g. via key F5.

Sample HTML Template File

The example shows how the placeholders can be used inside an HTML template file (Screen1.html). The full code is inside this Sample Player for HTML-Screens with including Visual Studio Project, see folder OTX-Mapping\APPs.

Sample OTX-Mapping PTX

Another OTF Sample Solution for OTX-Mapping with Player (source code see folder \EmotiveSampleSolution\OtxMappingSample\OTX-Mapping)

Note: The HTML file must be copied into ExternalAppPath.

To see the complete file click here to fold.

<!DOCTYPE html>
<html class="canvas">
<head>
<title>EMOTIVE HTML-Screen</title>
</head>
<body>
<h1 class="header1">{{type='ScreenSignatureInParameter' name='Ueberschrift' datatype='String' description='Die Überschrift wird im Header des Screens angezeigt'}}</h1>
<h2 class="header2" id="Beschriftungen1"></h2>
<div class="myProgress">
<div id="myBar1" class="myBar"></div>
</div>
<div id="value1" class="myValue">0.0</div>
<div class="containter-triangle">
<div id="GrenzwerteMinimum1" class="triangle-up"></div>
<div id="GrenzwerteMaximum1" class="triangle-up"></div>
</div>
</br></br>
<h2 class="header2" id="Beschriftungen2"></h2>
<div class="myProgress">
<div id="myBar2" class="myBar"></div>
</div>
<div id="value2" class="myValue">0.0</div>
<div class="containter-triangle">
<div id="GrenzwerteMinimum2" class="triangle-up"></div>
<div id="GrenzwerteMaximum2" class="triangle-up"></div>
</div>
<style>
.canvas {
color: #FFFFFF;
background-color: #2D2D2D;
font-family: 'segoe ui';
}
.header1 {
font-size: 250%;
}
.header2 {
font-size: 300%;
}
.myProgress {
width: 80%;
background-color: #2D2D2D;
display: inline-block;
}
.myBar {
width: 50%;
height: 50px;
background-color: #2D2D2D;
}
.triangle-up {
position: absolute;
left: 45%;
width: 0;
height: 0;
border-left: 25px solid transparent;
border-right: 25px solid transparent;
border-bottom: 40px solid #7FFF00;
transform: translateX(-50%);
}
.containter-triangle {
position: relative;
}
.myValue {
font-size: 250%;
font-weight: bold;
display: inline-block;
vertical-align: top;
}
</style>
<script>
// Mandatory dynamic content for client-side processing
// ====================================================
// start // Do not change the content between 'start" and 'end'
// Declare variables for web socket URL and the name of the screen signature.
var urlWebSocket = $Url_WebSocket; // $Url_WebSocket will be replaced by the web server at runtime
var screenSignature = $Screen_Signature; // $Screen_Signature will be replaced by the web server at runtime
// Creates a web socket at the given URL
let socket = new WebSocket(urlWebSocket);
// Adds an event handler if the socket receives a message
// Called each time, if a new parameter value was send from OTX procedure to web page
// Valid for ScreenInParameter and ScreenInOutParameter
socket.onmessage = function(event)
{
var msg = event.data;
var res;
// Parse the received message
if (msg.indexOf("UpdateValueRuntime") != 0)
{
res = JSON.parse(msg);
}
// If the message wants to update a value on the screen
if (res != null && res["TypeRequest"] == "UpdateValueOnCustomHtml")
{
if (screenSignature == res["ScreenSignature"])
{
// Parse the data of the message to get parameter name and value
valueUpdate = JSON.parse(res["Data"]);
var name = valueUpdate["Name"];
var value = valueUpdate["Value"];
// Update the value of the given parameter
UpdateValueCustomHtml(name, value);
}
}
// If the message wants reload the page
else if (res != null && (res["TypeRequest"] == "OpenScreen" || res["TypeRequest"] == "HighlightScreen" || res["TypeRequest"] == "CloseScreen"))
{
// Reload the page
location.reload();
}
};
// Must be called each time, if a new parameter value must be send from web page to OTX procedure
// Valid for ScreenOutParameter and ScreenInOutParameter
function UpdateValueRuntime(screenSignature, name, value)
{
var request = "UpdateValueRuntime|" + screenSignature + '|' + name + '|' + value;
if (socket != null && socket.readyState == WebSocket.OPEN)
{
socket.send(request);
}
}
// end
// ====================================================
// Optional dynamic content for client-side processing depending on the parameters of the screen
// =============================================================================================
//
// Declare all values for ScreenInParameter with placeholders
var Werte ={{type='ScreenSignatureInParameter' name='Werte' datatype='List<Float>' description='Liste der angezeigten Werte der Balken'}};
var Beschriftungen ={{type='ScreenSignatureInParameter' name='Beschriftungen' datatype='List<String>' description='Liste der angezeigten Beschriftungen der Balken'}};
var Minima={{type='ScreenSignatureInParameter' name='Minima' datatype='List<Float>' description='Liste Minimaler Anschläge der Messwertbalken (linker Rand, entspricht 0%)'}};
var Maxima={{type='ScreenSignatureInParameter' name='Maxima' datatype='List<Float>' description='Liste Maximaler Anschläge der Messwertbalken (rechter Rand, entspricht 100%)'}};
var GrenzwerteMinimum ={{type='ScreenSignatureInParameter' name='GrenzwerteMinimum' datatype='List<Float>' description='Liste minimaler Grenzwerte für die Soll-Wertebereiche'}};
var GrenzwerteMaximum ={{type='ScreenSignatureInParameter' name='GrenzwerteMaximum' datatype='List<Float>' description='Liste maximaler Grenzwerte für die Soll-Wertebereiche'}};
// Validate some input values
var realValueBar1, realValueBar2;
if (Maxima instanceof Array && Minima instanceof Array)
{
realValueBar1 = 100/(Maxima[0]-Minima[0]);
realValueBar2 = 100/(Maxima[1]-Minima[1]);
}
// Update the parameter value inside the screen
UpdateValueCustomHtml("Beschriftungen", Beschriftungen);
UpdateValueCustomHtml("GrenzwerteMinimum", GrenzwerteMinimum);
UpdateValueCustomHtml("GrenzwerteMaximum", GrenzwerteMaximum);
// Update the parameter values in HTML
function UpdateValueCustomHtml(name, value)
{
if (name == "Beschriftungen")
{
if (value instanceof Array)
{
document.querySelector('#Beschriftungen1').textContent = value[0];
document.querySelector('#Beschriftungen2').textContent = value[1]
}
}
else if (name == "Werte")
{
value = JSON.parse(value);
if (value instanceof Array)
{
document.querySelector('#value1').innerHTML = value[0].toFixed(2);
document.querySelector('#value2').innerHTML = value[1].toFixed(2);
UpdateProcessBar("myBar1", parseInt(value[0].toFixed(2)), realValueBar1, GrenzwerteMinimum[0], GrenzwerteMaximum[0]);
UpdateProcessBar("myBar2", parseInt(value[1].toFixed(2)), realValueBar2, GrenzwerteMinimum[1], GrenzwerteMaximum[1]);
UpdateTriangleBar1(parseInt(value[0].toFixed(2)), GrenzwerteMinimum[0], GrenzwerteMaximum[0]);
UpdateTriangleBar2(parseInt(value[1].toFixed(2)), GrenzwerteMinimum[1], GrenzwerteMaximum[1]);
}
}
else if (name == "GrenzwerteMinimum")
{
if (value instanceof Array)
{
LocateMinMaxGrenzwerte(document.querySelector('#GrenzwerteMinimum1'), value[0], realValueBar1);
LocateMinMaxGrenzwerte(document.querySelector('#GrenzwerteMinimum2'), value[1], realValueBar2);
}
}
else if (name == "GrenzwerteMaximum")
{
if (value instanceof Array)
{
LocateMinMaxGrenzwerte(document.querySelector('#GrenzwerteMaximum1'), value[0], realValueBar1);
LocateMinMaxGrenzwerte(document.querySelector('#GrenzwerteMaximum2'), value[1], realValueBar2);
}
}
}
function UpdateProcessBar(id, value, realValue, min, max)
{
var bar = document.getElementById(id);
if (value > max || value < min)
{
bar.style.backgroundColor = "#ff0000";
}
else {
bar.style.backgroundColor = "#7FFF00";
}
value = realValue * value;
bar.style.width = value + '%';
}
function LocateMinMaxGrenzwerte(element, value, realValue)
{
value = realValue * value * 0.8;
element.style.left = value + '%';
}
function UpdateTriangleBar1(value, min, max)
{
var triangleBarMin1 = document.getElementById("GrenzwerteMinimum1");
var triangleBarMax1 = document.getElementById("GrenzwerteMaximum1");
if (value > max || value < min)
{
triangleBarMin1.style.borderBottom = "40px solid #ff0000";
triangleBarMax1.style.borderBottom = "40px solid #ff0000";
}
else
{
triangleBarMin1.style.borderBottom = "40px solid #7FFF00";
triangleBarMax1.style.borderBottom = "40px solid #7FFF00";
}
}
function UpdateTriangleBar2(value, min, max)
{
var triangleBarMin2 = document.getElementById("GrenzwerteMinimum2");
var triangleBarMax2 = document.getElementById("GrenzwerteMaximum2");
if (value > max || value < min)
{
triangleBarMin2.style.borderBottom = "40px solid #ff0000";
triangleBarMax2.style.borderBottom = "40px solid #ff0000";
}
else
{
triangleBarMin2.style.borderBottom = "40px solid #7FFF00";
triangleBarMax2.style.borderBottom = "40px solid #7FFF00";
}
}
</script>
</body>
</html>